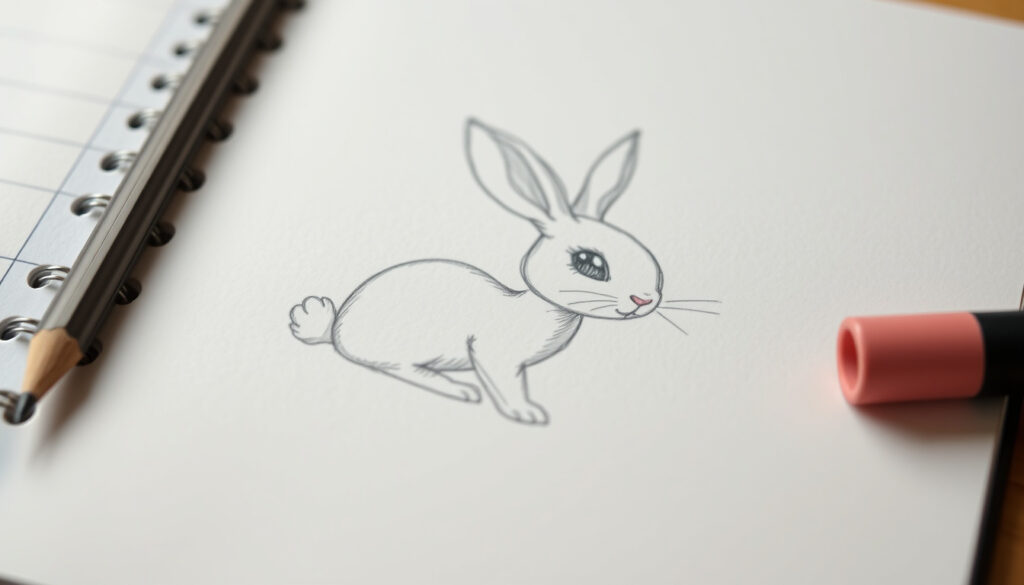
How to Draw a Bunny: Easy Step-by-Step Tutorial for Beginners
There’s something about a bunny drawing that feels like it should be easy — rounded body, big ears, cute face. And yet, getting the proportions right or choosing between a cartoon and realistic style leaves many beginners stuck before they even pick up a pencil.
Basic shapes used: Circle, oval, triangle ·
Commonly recommended pencil: HB ·
Steps in a basic bunny drawing: 5-7 ·
Most popular style: Cute cartoon ·
Typical completion time: 15-30 minutes
Quick snapshot
- Drawing a bunny starts with basic geometric shapes (Easy Drawing Guides)
- A step-by-step approach reduces complexity for beginners (YouTube drawing tutorial)
- Pencil and paper are the standard materials (Easy Drawing Guides)
- 5-6 steps cover a basic bunny drawing (Easy Drawing Guides)
- Exact number of steps varies by artist and style
- Best pencil grade depends on desired texture and shading
- Popular bunny drawing tutorials have been published online since at least 2016 (YouTube – How To Draw A Realistic Bunny)
- A dedicated kid-focused tutorial appeared as recently as 2026 (YouTube – Cute Bunny for Kids)
- More short-form bunny drawing content on TikTok and social platforms
- Growing interest in realistic rabbit drawing tutorials
What are some bunny drawing ideas?
Before you start drawing, it helps to know the range of styles available. The most common bunny drawing ideas fall into several categories, each with a different level of difficulty and a different purpose.
Cartoon bunnies
- Rounded shapes and oversized heads dominate this style
- Emphasis on cuteness over anatomical accuracy
- Typically use 4-6 simple lines and a single color fill
The trade-off: cartoon bunnies are the quickest to produce but offer the least room for artistic growth once you master the basic shapes.
For absolute beginners, cartoon bunnies are the ideal starting point — they require only a circle, an oval, and a few curved lines to produce a recognizable result in under five minutes.
Realistic rabbits
- Requires attention to fur texture, ear proportions, and eye placement
- Uses shading techniques like cross-hatching for depth (Easy Drawing Guides – realistic bunny tutorial)
- Typically takes 20-40 minutes for a simple study
The implication: realistic rabbit drawing demands more time and tools (multiple pencil grades, blending stumps) but rewards with a more satisfying final piece that actually looks like a real animal.
Easter bunnies
- Adds thematic elements like baskets, eggs, or pastel colors
- Often uses the same base shapes as cartoon bunnies
- Can be seasonal or year-round depending on style
Bunnies in different poses
- Sitting, hopping, and lying down are the most common poses
- Each pose changes the body-to-head ratio and leg placement
- Reference photos of real rabbits help with accuracy
Artists who only draw bunnies from one angle or pose often hit a plateau. Practicing multiple poses forces you to understand underlying anatomy rather than memorizing a single formula.
How to draw a cute easy Easter bunny?
Easter bunnies are among the most searched drawing tutorials, and for good reason — they combine a forgiving cartoon style with festive elements. Here’s how to draw one in about 15 minutes.
The seven-step progression below reveals the consistent structural foundation that Easter bunnies share with generic cartoon bunnies, with decorative accessories substituted for additional complexity.
| Step | Action | Key detail | Source |
|---|---|---|---|
| 1 | Draw a large oval for the body | 2:1 width-to-height ratio | YouTube – Cute Bunny for Kids tutorial |
| 2 | Add a circle for the head | Slightly overlapping the body oval | Easy Drawing Guides |
| 3 | Draw two tall curved ears | Same height as the head | Art Projects for Kids |
| 4 | Add facial features | Large round eyes, small triangle nose | |
| 5 | Draw legs and a fluffy tail | Ovals for back legs, circle for tail | |
| 6 | Add Easter basket optional | Small half-circle and handle | |
| 7 | Color with pastels | Pink, light blue, yellow |
The pattern: the Easter bunny uses the same structural foundation as a generic cartoon bunny but substitutes decorative accessories for additional complexity. The difference is purely cosmetic.
Basic shapes for the head and body
Start with a large oval for the body and a circle for the head that overlaps the top third of the oval. This gives the bunny a classic sitting posture. The head should be about half the width of the body for a cute, childlike proportion.
Adding long ears and a fluffy tail
Ears should be tall and slightly curved inward at the tips. The tail is a small circle placed at the opposite end of the body from the head. For an Easter variant, add a small basket shape next to the body.
Drawing the face: eyes, nose, whiskers
Use simple curved lines for the face. The eyes should be large and positioned low on the head to emphasize cuteness. The nose is a tiny triangle or oval, and whiskers are three straight lines on each side of the nose.
Coloring and optional basket
Pastel colors (pink, light blue, yellow) work best for Easter. If including a basket, draw a half-oval below the bunny’s front paws and connect it with a curved handle. Fill the basket with small oval shapes for eggs.
How to draw a bunny step by step?
This universal step-by-step process works for any bunny style — just adjust the level of detail at each stage. Most published tutorials follow a similar pattern of five to seven steps (Sabrillu Blog – 9-step rabbit tutorial).
Drawing the basic shapes
- Start with light pencil strokes — HB is standard
- Use a circle for the head and a larger oval for the body
- Mark guidelines for ear placement
Adding the ears
The ears are the most distinctive feature of any bunny. They should be long and oval-shaped, with the outer edges extending above the head. For a cartoon bunny, the ears can be as tall as the head itself.
Facial details
- Eyes: large and round for cartoon, almond-shaped for realistic
- Nose: small triangle or heart shape
- Whiskers: thin lines, 3-4 per side
- Mouth: curved line just below the nose
Body and legs
The body connects to the head with a smooth neck curve if visible. Back legs should be larger than front legs for a realistic bunny. For a sitting pose, the front paws rest below the chin, and the back feet extend forward.
Final touches and shading
- Outline in darker pencil (2B or 4B) once shapes are confirmed
- Erase guide lines carefully
- Add fur texture with short strokes following the direction of fur growth
- Shade under the chin and belly for depth
The pattern: every step from basic shapes to shading is a continuum of increasing detail. Beginners should stop at step 3-4; intermediate artists push through to shading.
How to draw a realistic bunny?
Realistic bunny drawing is where the skill gap widens. The approach shifts from “making it cute” to “making it accurate.” The Easy Drawing Guides realistic bunny tutorial starts with the eye — a double-pointed almond shape with two small circles for highlights (Easy Drawing Guides – eye drawing method).
Understanding bunny anatomy
- Rabbits have a distinctive head shape — wider at the cheeks, narrower at the snout
- Ears are not flat; they fold slightly at the middle
- The back legs are longer and more muscular than the front legs
- The tail is a small fluff, not a long appendage
Sketching proportions
The proportion table below converts observed anatomy into measurable guidelines, giving the artist a structural framework to build from.
| Body part | Proportional guideline | Source |
|---|---|---|
| Head | 1/4 of total body length | Easy Drawing Guides |
| Ears | Same length as head | Art Projects for Kids |
| Body | 2/4 of total length | |
| Legs | 1/4 total (back legs dominate) |
The implication: getting proportions correct early in the sketch saves significant rework during the shading phase.
Shading for fur texture
Use cross-hatching for fur depth. Short overlapping strokes that follow the direction of fur growth create a convincing texture. Focus on light and shadow to create volume — the fur under the chin and belly should be darker, while the top of the head catches light. The Sabrillu tutorial recommends using multiple pencil grades (HB for base, 2B for shadows, 4B for deep fur) (Sabrillu Blog).
Adding details like eyes and nose
The realistic eye is not a big circle — it’s a narrow almond with a visible iris and two highlight circles. The nose should have small visible pores around the nostrils. Whiskers are not just lines; they taper at the ends and emerge from small dots on the muzzle.
How to draw a bunny for kids?
Kid-friendly bunny drawing prioritizes simplicity and reward speed. The Art for Kids Hub tutorial on YouTube describes its own style as “a little too cute,” leaning into oversized features and minimal lines (YouTube – Art for Kids Hub bunny).
Using simple geometric shapes
- Draw big circles and ovals for ease
- Avoid sharp angles — use rounded corners everywhere
- Limit the drawing to 4-5 steps
Large, expressive eyes
Kids respond to oversized eyes. They should take up about a third of the face. Adding a small white dot inside each eye gives the bunny a lively expression. The mouth should be a simple curved line.
Minimal details for easy coloring
Leave out fur texture, shading, and whisker pores. The entire drawing should be colored with crayons or markers. The Art for Kids Hub bunny face lesson includes a coloring page (Art Projects for Kids – bunny face).
Adding a background or accessories
For kids, the background is part of the fun. A simple green ground line, a blue sky circle, or grass tufts make the drawing feel complete. Accessories like a basket, a bowtie, or a carrot add personality without increasing difficulty.
The trade-off: kid-friendly bunnies sacrifice realism and detail for speed and emotional reward. For a 12-year-old ready for a challenge, realistic drawing tutorials offer more room to grow.
youtube.com, youtube.com, dataforseo.com, docs.dataforseo.com, facebook.com, docs.dataforseo.com
Frequently asked questions
How to draw a bunny with pencil only?
Use an HB pencil for initial sketches, a 2B for darker outlines, and a 4B for shading. Erasers are essential for guide lines.
What is the easiest bunny drawing for beginners?
The cartoon Easter bunny using circles and ovals is the easiest. Follow the seven-step table in the Easter bunny section above.
How long does it take to learn to draw a bunny?
Most beginners produce a recognizable cartoon bunny in 15-30 minutes. Realistic bunny drawing typically requires 2-3 practice sessions to get proportions right.
How to draw a bunny face step by step?
Start with an oval for the head, add two tall ears, then draw large round eyes, a small nose, and curved whiskers. The Art Projects for Kids lesson provides a full template (Art Projects for Kids).
Can I draw a bunny without a reference?
For cartoon bunnies, yes — geometric shapes are enough. For realistic bunnies, reference photos of real rabbits significantly improve accuracy.
More related posts
 Rainbow Six Siege Tracker: How to Check Stats, Rank & More
 Steal a Brainrot Unblocked – Guide to Safe School Access
 Black Mirror Season 1 Cast: Every Actor and Character
 What Causes Low Blood Sugar? Causes & Treatment
 House of the Rising Sun: Origin, Best Version, and Lyrics Explained
 Nintendo Switch 2: Release Date, Specs, Sales & PS5 Comparison
 How Did Hulk Hogan Die – Cardiac Arrest, Surgery and Hoax Facts
 Golden Lyrics KPop Demon Hunters: Song, Singers & LGBTQ